You can review and manage casual vacancies in MSS.
Review casual vacancies
To review casual vacancies:
- Go to Casual Relief > Casual Vacancies > Casual Vacancies.
- EmpowerHR displays the Casual Vacancies screen.
- At the Search Filter, in:
- Section, select a school from the dropdown list
- From, click Date Lookup and select a date to search on
- Click Search. EmpowerHR displays all vacancies for the selected school (except any vacancies filled and finished before the From date in your search).
 |
EmpowerHR automatically generates vacancies to cover absences due to leave and personal development (training). |
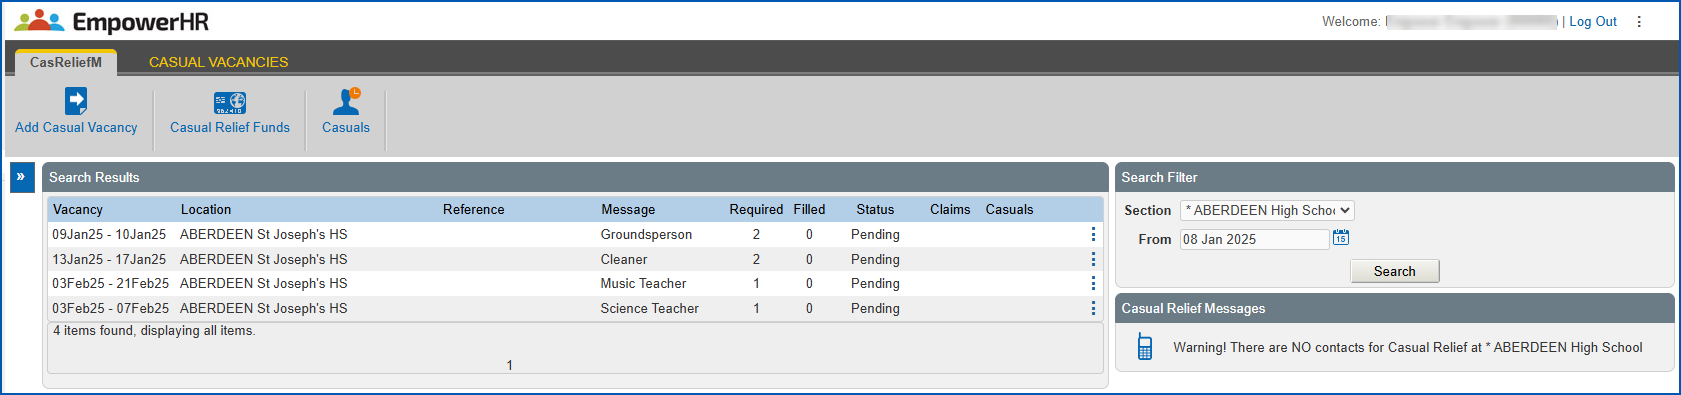
Here is an explanation of the fields on the Casual Vacancies screen.
| Field | Explanation |
|---|---|
Vacancy | Vacancy period (from and to dates) |
Location | Where the vacancy is located |
Reference | Vacancy reason (for example, leave) and, if known, the name of the person who is to be relieved |
Message | Displays any text you entered in the Message field when creating the vacancy. |
Status | The Status field indicates whether the vacancy is:
|
Required | The number of casual relief staff needed to fill the vacancy |
Filled | The number of casual relief staff who have filled the vacancy |
Claims | N/A |
Casuals | Name of casual who has filled vacancy. |
Create/change a casual vacancy
To create a new vacancy or change an existing vacancy:
- Go to Casual Relief > Casual Vacancies > Casual Vacancies.
- At the Casual Vacancies screen, search for casual vacancies.
- When your search results are listed, to:
- create a new vacancy, click Add Casual Vacancy, or
- edit an existing vacancy, on the row showing the vacancy, click Actions and then select Edit Vacancy from the menu
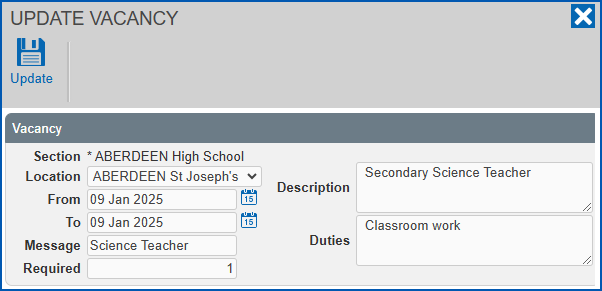
- At the Create Vacancy (or Update Vacancy) detail screen, complete/update the fields using the following table as a guide.
| At this field... | Do this... |
|---|---|
Section | Leave the default section, or select a different section from the dropdown list. |
Location | Select a location from the dropdown list. |
Description | Enter a (text) description of the vacancy. |
From | Click Date Lookup and select the start date of the vacancy. |
To | Click Date Lookup and select the end date of the vacancy. |
Duties | Enter a brief (text) description of the duties required of the vacancy. |
Message | Enter text to display on the Casual Vacancies screen. |
Required | Enter the number of casual relief staff required. |
- If you:
- created a new vacancy, click Create to save your entries.
- edited an existing vacancy, then click Update to save your changes.
Nominate who receives messages
During the casual relief vacancy process, EmpowerHR sends SMS/email messages to advise staff about progress. For example:
- a casual accepted your vacancy
- your vacancy has been escalated to the next stage
- your vacancy has been escalated to the last stage
- your vacancy has not been filled
- urgent! Casual has cancelled
To nominate who receives the messages:
- Go to Casual Relief > Casual Vacancies > Casual Vacancies.
- At the Casual Vacancies screen, search for casual vacancies.
- When your search results are listed, at Casual Relief Messages, click Messages.
- EmpowerHR displays the Contact for Casual Relief screen showing a list of everyone with access to the Casual Vacancies screen and the section (school). A green checkmark
 appears in the checkbox next to a person if they receive messages.
- To:
- stop messages going to an individual, clear the checkbox next to their name
- nominate an individual to receive messages, click the checkbox next to their name
|
|
|
- Click Update.
Manage vacancy requirements
Use the following steps to capture the teaching areas, skills, and competencies required of a casual vacancy. EmpowerHR considers this information when prioritising the available casuals, that is, qualified staff receive a higher priority than unqualified staff.
To manage a vacancy's requirements:
- Go to Casual Relief > Casual Vacancies > Casual Vacancies.
- At the Casual Vacancies screen, search for casual vacancies.
- When your search results are listed, at a vacancy row, click Actions and then select Requirements from the menu.
- EmpowerHR displays the Requirements screen.
- Click New Requirement.
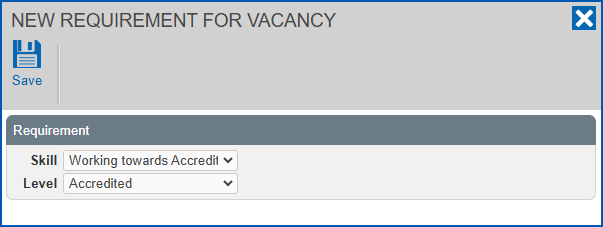
- EmpowerHR displays the New Requirement for Vacancy screen.
- At:
- Skill, select the required skill from the dropdown list
- Level, select the required skill level from the dropdown list
- Click Save.
- Repeat this procedure, starting at step 2, until you have added all the requirements you need.
- When you are done, click Back to Search to return to the Casual Vacancies screen.
Manage vacancy dates and times
EmpowerHR completes a vacancy's dates and times. However, you may need to revise the information where dates and times are non-standard. For example, if shifts are irregular or have non-standard start/end times, you can capture the dates and times by creating specific shifts.
To manage a vacancy's dates and times:
- Go to Casual Relief > Casual Vacancies > Casual Vacancies.
- At the Casual Vacancies screen, search for casual vacancies.
- When your search results are listed, at a vacancy row, click Actions and then select Dates/Times from the menu.
- EmpowerHR displays the Dates/Times screen.
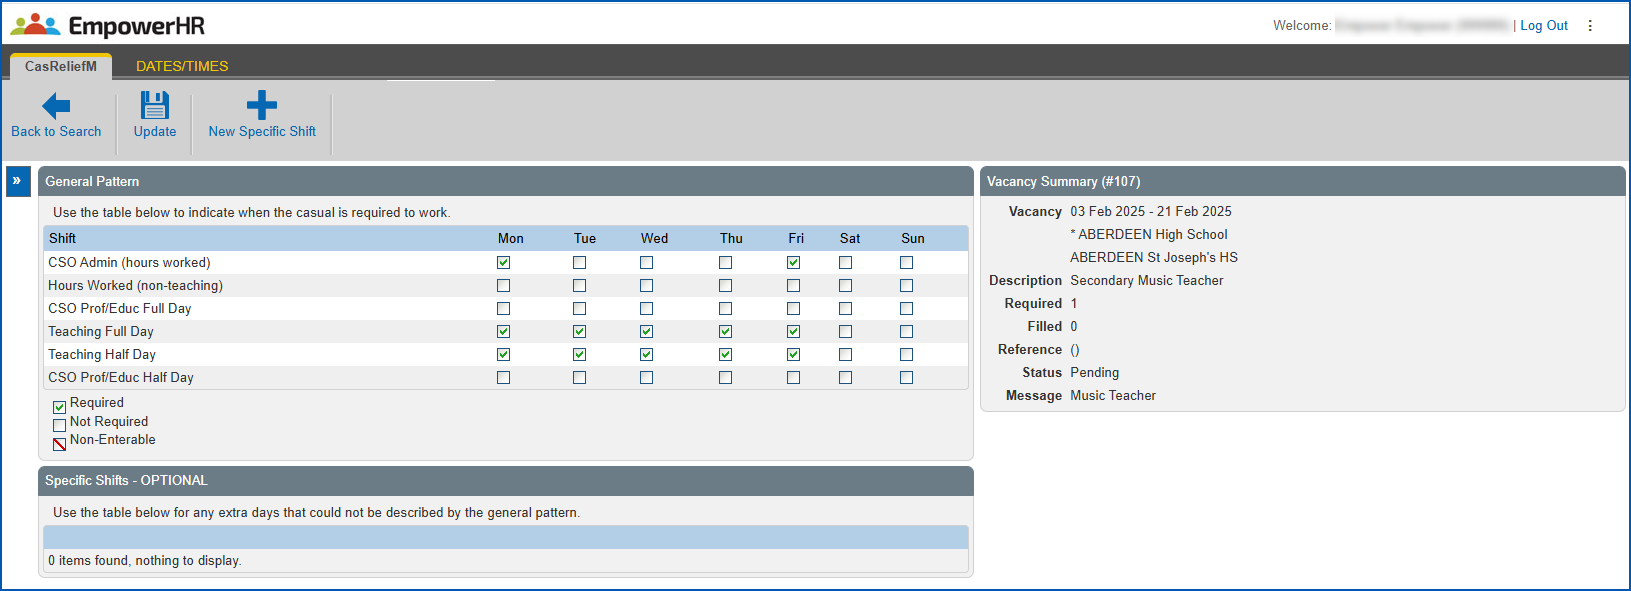
- In General Pattern, select the checkbox against each day required of the vacancy. A green checkmark appears in the selected checkbox to show when a shift is required.
|
|
A cleared checkbox shows the shift is not required. |
- If you:
- need to create a specific shift, click New Specific Shift. At the Create Specific Shift screen, enter the shift details, and then click Save Go to step 7.
- don't need to create a specific shift, go to step 7.
|
|
EmpowerHR displays a warning if you try to create a specific shift when the shift already appears selected under General Pattern. You must first clear the checkbox under General Pattern before you can create the specific shift. |
- Click Update.
© 2023 Fusion5. All rights reserved.