Set the display of leave requests, details and balances
The leave element called (rnet) Self service leave types defines how EmpowerHR displays the leave balances section and types of leave.
Identify all the accruing leave types required for the entitlements/balances you want to display in self service. Make sure you allocate them to the rnet leave element.
See leave element codes for more information.
 |
You don't need to include any non-accruing leave types in the rnet leave element as a balance is not maintained. |
Send leave requests directly to EmpowerHR
You can choose for EmpowerHR to automatically generate a leave booking once the manager approves the leave request (rather than having to go via the desktop Alerter). You do this by using a Self Service Finalise step in the workflow.
Based on the leave rules, some requests use self service finalise, whereas some requests must still go via the desktop Alerter.
The type of request (add, change or delete) also has a bearing on whether self service finalise or desktop Alerter workflow must be used.
For more information, see the EHR Workflow Manual, available by logging an iHelp request.
Return MSS-initiated requests to employee
Certain workflow types allow a manager to create a leave request on behalf of an employee and return it to them for confirmation or completion. For example, when the employee returns to work after taking sick leave.
To switch on this feature:
- Go to Administration > Workflow > Workflow Settings.
- EmpowerHR displays the Workflow Settings summary screen.
- Select the row containing the setting you want to change, and click Next Level.
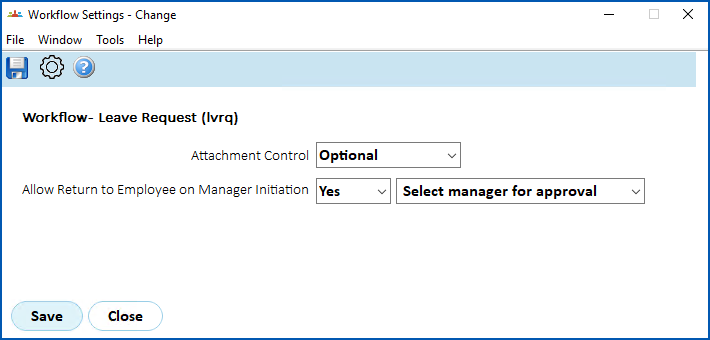
- At the Workflow Settings - change (detail) screen, in:
- Allow Return to Employee on Manager Initiation, select Yes from the dropdown list, and
- set whether the employee must forward the request back to the initiating manager, or a different manager, for approval
- Click Save.
Set up warning/error message for overlapping bookings
Using field error validation, you can trigger a warning or error message when an employee enters a leave request booking that overlaps with another booking.
To set up a warning or error message for overlapping bookings:
- Go to Administration > Screen Management > Field Error Validation.
- At Field Error Validation, expand Requests, and then expand Leave.
- At Add Leave Request, click Change.
- EmpowerHR displays the Field Severity details screen.
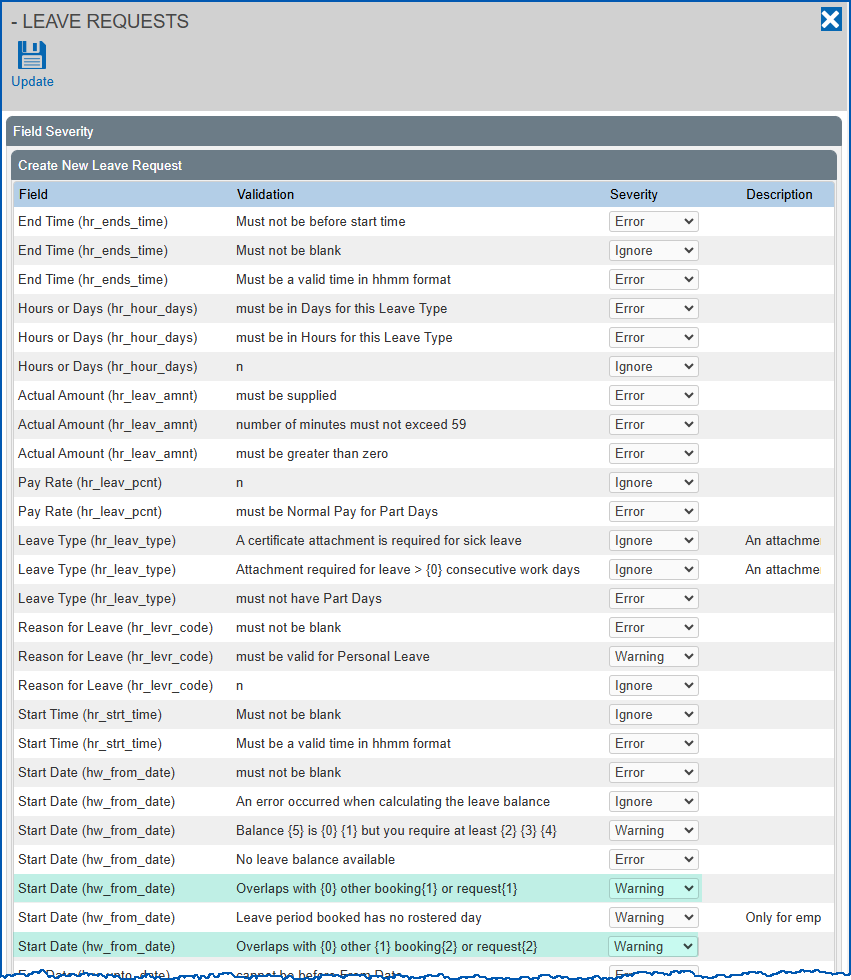
- At each of the following fields, select Warning or Error from the Severity dropdown list.
- Start Date (hw_from_date)...Overlaps with {0} other booking{1} or request{1}
- Start Date (hw_from_date)...Overlaps with {0} other {1} booking{2} or request{2}
- Click Update.
Set up low balance warnings
|
If your organisation uses timesheet leave, to be able to use low balance warnings, you need to update the installation option called (fbta) Forward balance on timesheet leave by entering y in the Character field. |
Set up low balance warnings for managers
To set up low balance warning messages for managers:
- Go to Administration > Configuration > All Configuration.
- At Configuration Items, expand Self Service, and then expand Employee Self Service.
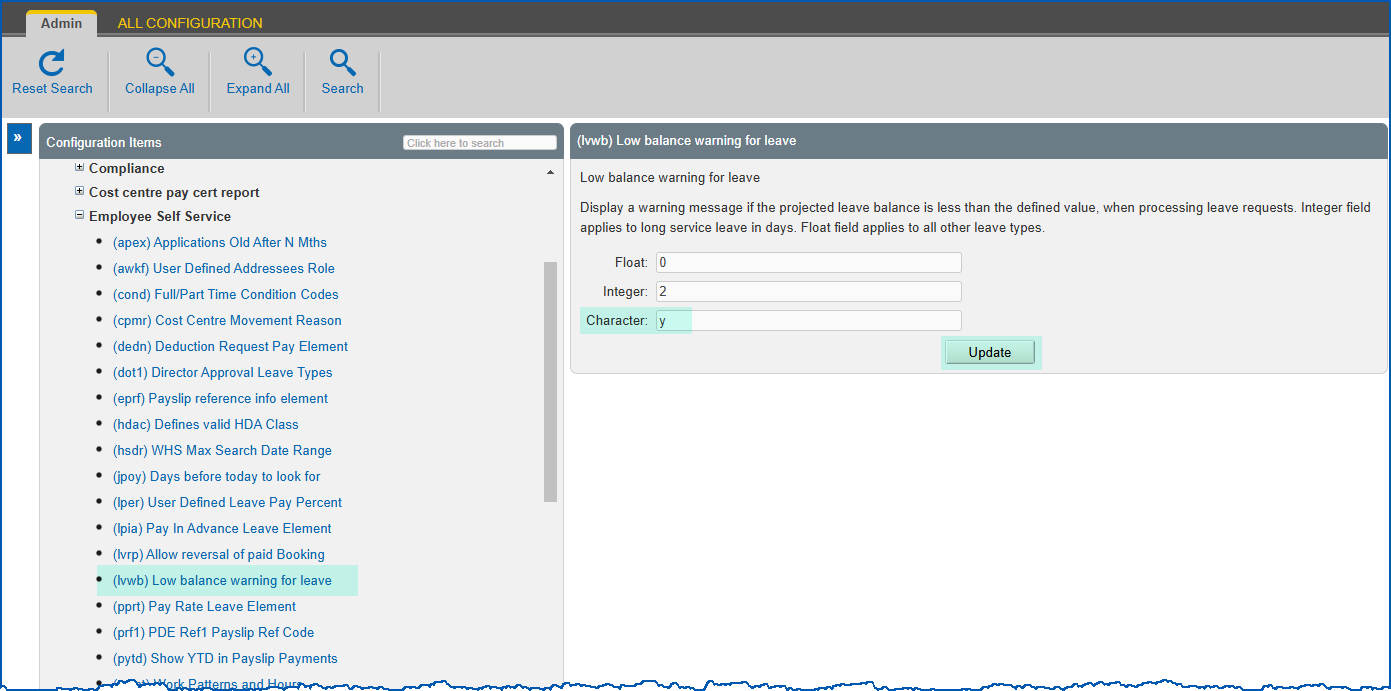
- Click (lvwb) Low balance warning for leave.
- Enter y in the Character field.
|
|
The value in the Integer field is the default value for LSL in days. The value in the Float field is the default for other leave. EmpowerHR only uses these default values if there is no warning amount defined in the leave rules. |
- Click Update.
Set up low balance warnings for employees
To set up low balance warning messages for employees:
- Go to Administration > Screen Management > Field Error Validation.
- At Field Error Validation, expand Requests, and then expand Leave.
- At Add Leave Request, click Change.
- EmpowerHR displays the Field Severity details screen.
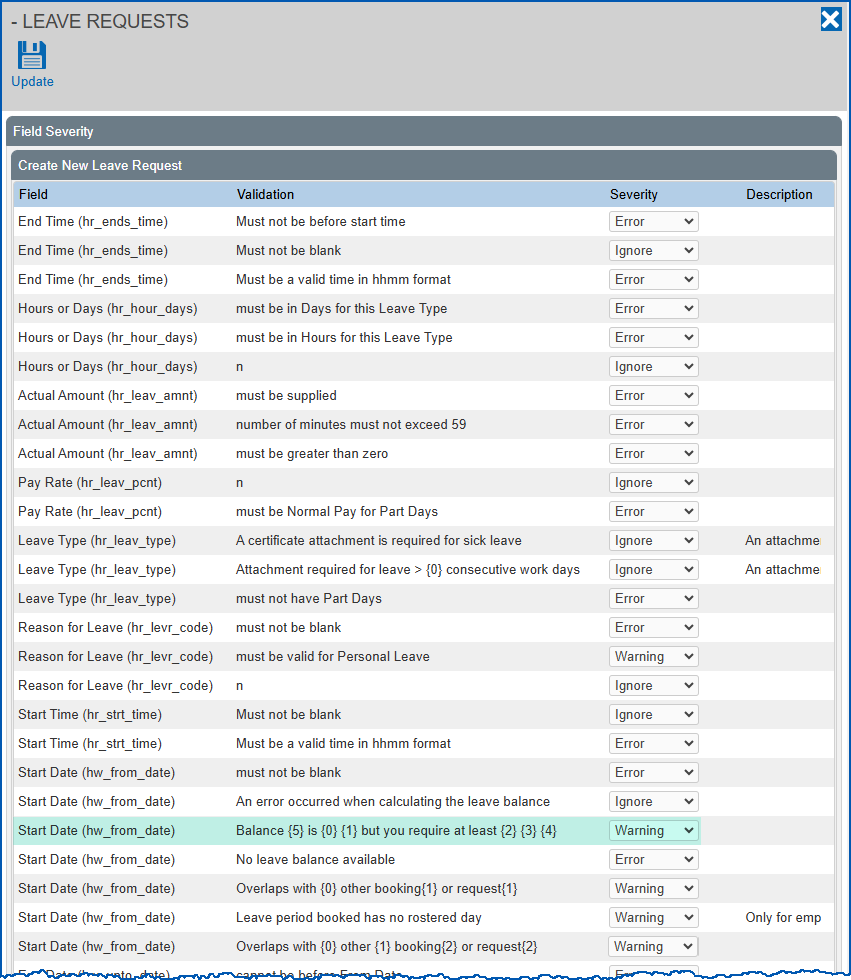
- At the following field, select Warning or Error from the Severity dropdown list.
Start Date (hw_from_date)...Balance is {5} {0} {1} but you require at least {2} {3} {4}
- Click Update.
What do the numbers mean?
In the low balance warning message, the following substitutions take place:
| {5} | If the installation option called (lrft) Leave requests to include future accruals and bookings is set to y, then {5} = taking into account future accrual bookings |
| {0} | Employee's current balance. This balance includes pending requests (the balance is reduced). If the installation option called (lrft) Leave requests to include future accruals and bookings is set to y, future bookings further reduce the balance. |
| {1} | Units, either hours or days. |
| {2} | Balance the employee needs in order to make a booking. This balances considers the minimum hours/days for a booking and the low balance amount stored in the installation setting called (lwvb) Low balance warning for leave. |
| {3} | Units, either hours or days. |
| {4} | Placeholder for recreation leave. This allows you to add additional information to the warning and can be modified using the following steps:
|

|
|
Using the installation option (lrft) Leave requests to include future accruals and bookings offers greater balance tolerance in tolerance checking. If you set lrft to y, then instead of calculating and checking tolerance based on the leave request From date, EmpowerHR considers all future accruals and bookings when ensuring the booking does not exceed the overall leave balance tolerance. While future pending requests are not included in the leave toleration calculation, past pending requests are. |
Set up evidence/certificate messages
You can tailor the messages EmpowerHR displays when someone completes the evidence required (personal leave) or certificate (sick leave) fields on a leave request.
To set up the leave request evidence/certificate messages:
- Go to Administration > Configuration > All Configuration.
- At Configuration Items, expand Self Service Properties, and then expand Workflow.
- Click Leave.
- Scroll down and change the message in each of the following properties:
- .workflow.lvrq.errors.certificate
- .workflow.lvrq.errors.evidence
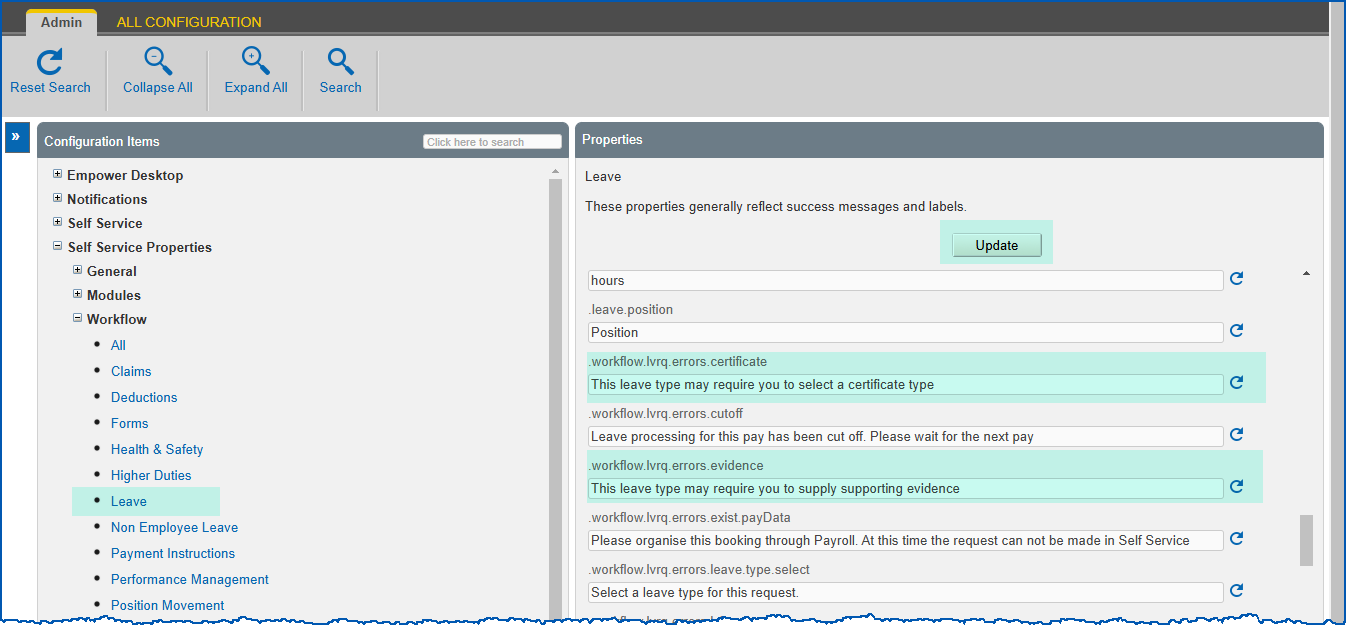
- Click Update.
Make sick/personal certificate attachments optional or mandatory
You can make providing attachments for sick and/or personal leave requests optional or mandatory using field error validation. For example, if you set the field error validation to Error and the employee's request exceeds the number of days in the Consecutive Days without a Certificate field of installation constants (in desktop), an error message displays when the employee tries to request leave without an attachment.
To make sick/personal certificate attachments optional or mandatory:
- Go to Administration > Screen Management > Field Error Validation.
- At Field Error Validation, expand Requests, and then expand Leave.
- At Add Leave Request, click Change.
- EmpowerHR displays the Field Severity details screen.
- At each of the following fields, select Warning or Error from the Severity dropdown list
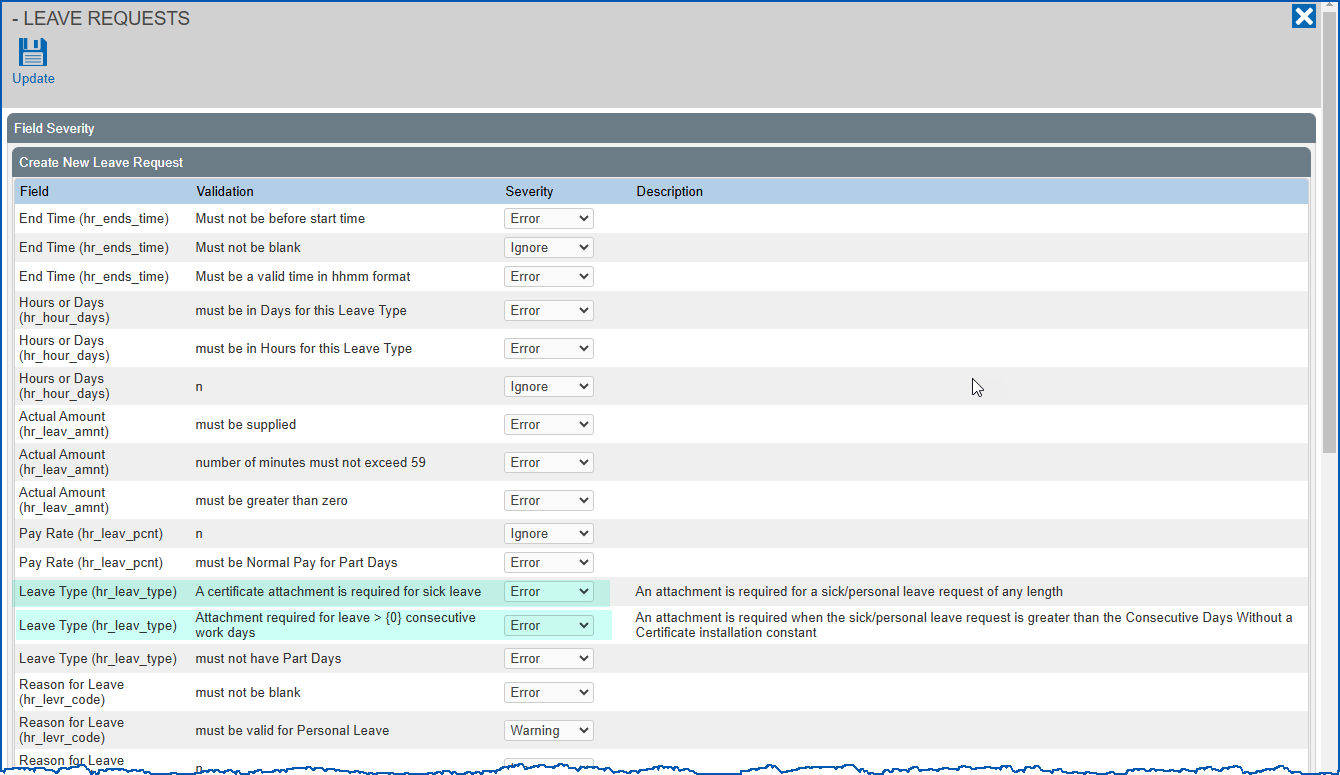
- Click Update.
Add valid attachment file extensions to help text
To add valid attachment file extensions to the help text:
- Go to Administration > Configuration > All Configuration.
- At Configuration Items, expand Self Service Properties, and then expand General.
- Click Attachments.
- In the property called .attachment.available.file.extensions, add the file extension type you want.
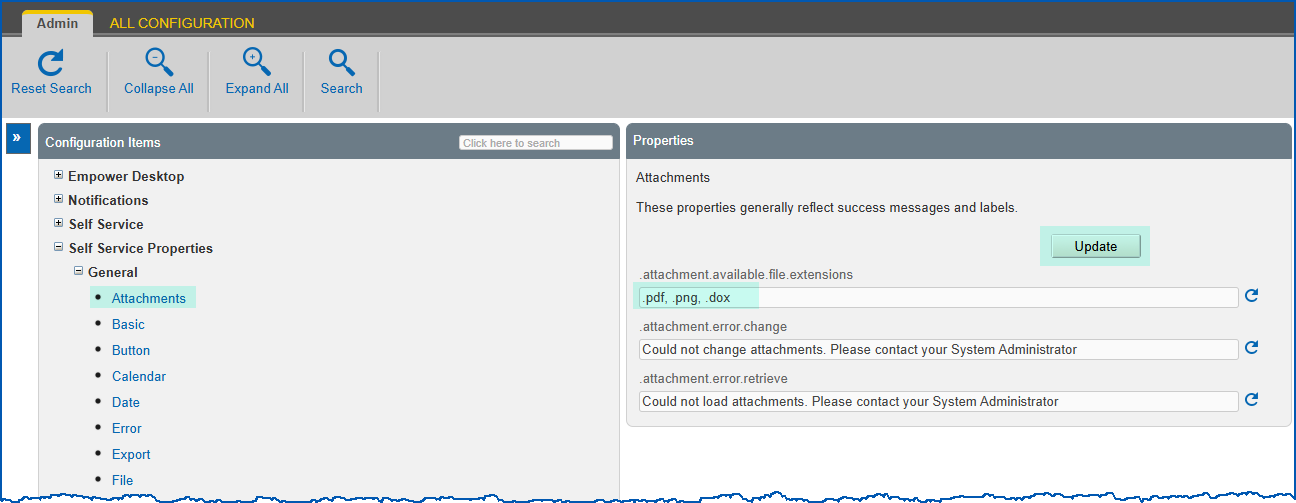
- Click Update.
Allow deletion (reversal) of paid leave
Use the following steps if your organisation wants to let employees request deletion (reversal) of paid leaving bookings.
To allow deletion (reversal) of paid leave:
- Go to Administration > Configuration > All Configuration.
- At Configuration Items, expand Self Service, and then expand Employee Self Service.
- Click (lvrp) Allow reversal of paid booking.
- Enter y in the Character field.
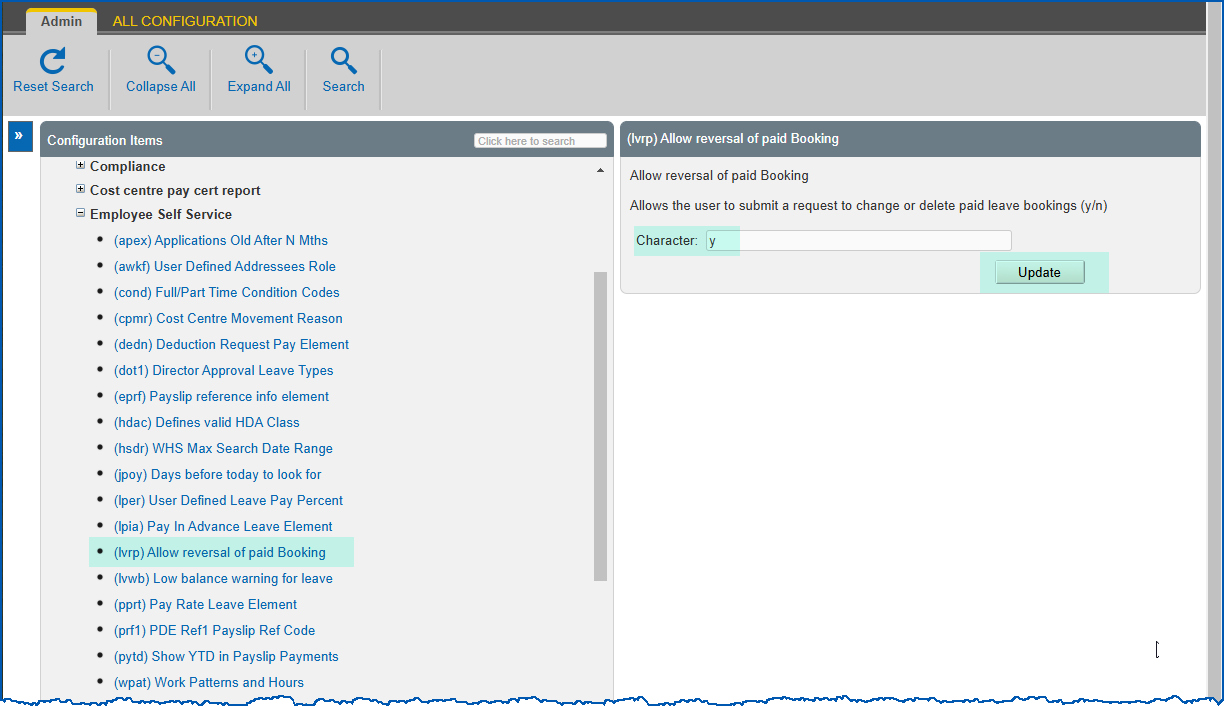
- Click Update.
- Any nominated leave rule and corresponding (fully or partially) paid leave booking now displays the change and delete buttons.
Restrict availability of paid leave change/delete
|
|
This procedure is only relevant if you have set the (lvrp) Allow reversal of paid booking set to y. |
You can restrict employees from accessing the change and delete functions on leave booking history records that are earlier than a particular period (that is, before the number of days you set in EmpowerHR), without affecting their ability to view requests.
To set the restriction on employees changing/deleting paid leave bookings:
- Go to Administration > Configuration > All Configuration.
- At Configuration Items, expand Self Service, and then expand Leave.
- Click (lhcd) Show/hide icons for past leave.
- Enter the number of days in the Integer field. The following example sets the number of days to 1000. Leave bookings earlier than the last 1000 days do not allow change or deletion.
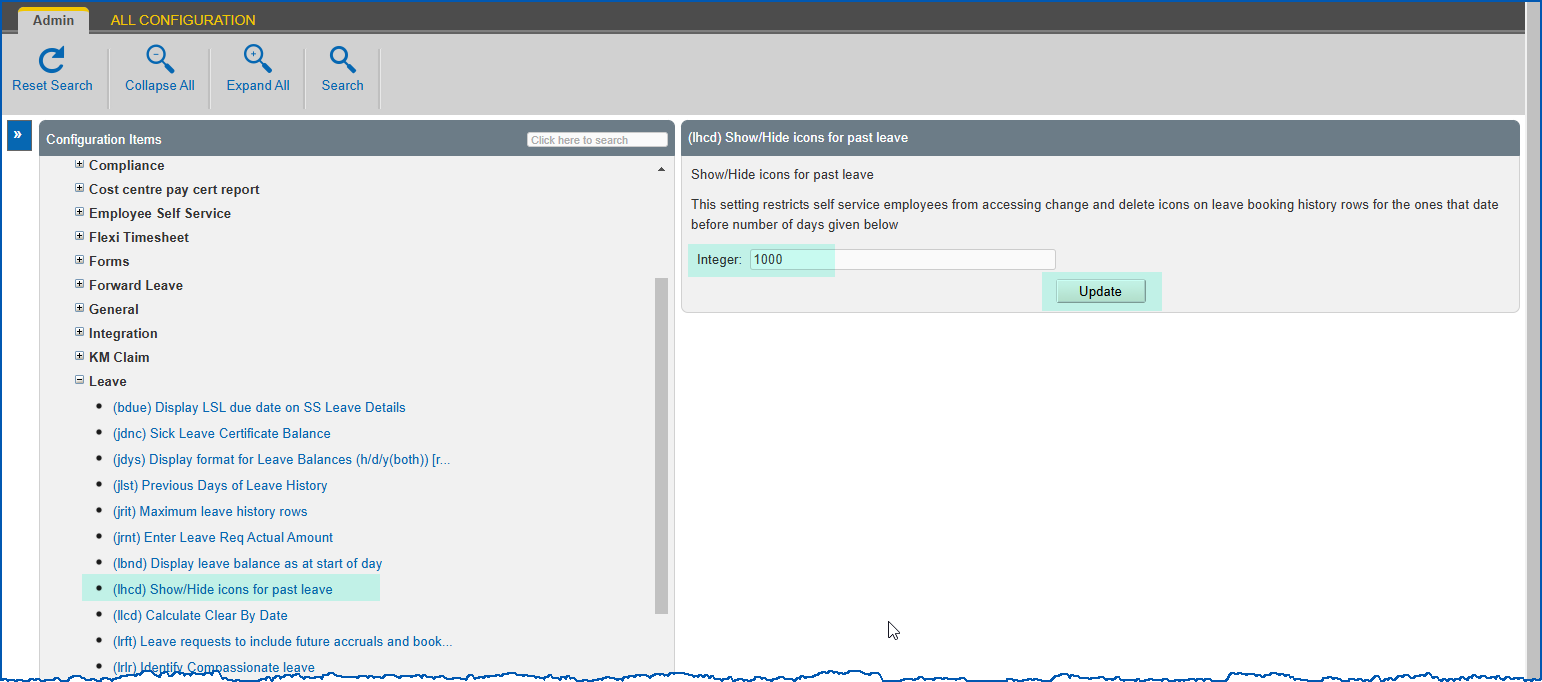
- Click Update.
Set up leave taken reasons for leave requests
See leave taken reason codes for how to set up leave taken reasons for leave requests.
Link compassionate leave
See compassionate/bereavement leave for how to link this type of leave to leave reasons on leave requests.
Display additional text below reason for leave field
To display additional text below the reason for leave field on the leave request:
- Go to Administration > Configuration > All Configuration.
- At Configuration Items, expand Self Service Properties, and then expand Workflow.
- Click Leave.
- Locate the .workflow.lvrq.form.leave.reason.help property and enter the text you want to display below the Reason for Leave field on the leave request. You can include formatting, links, etc
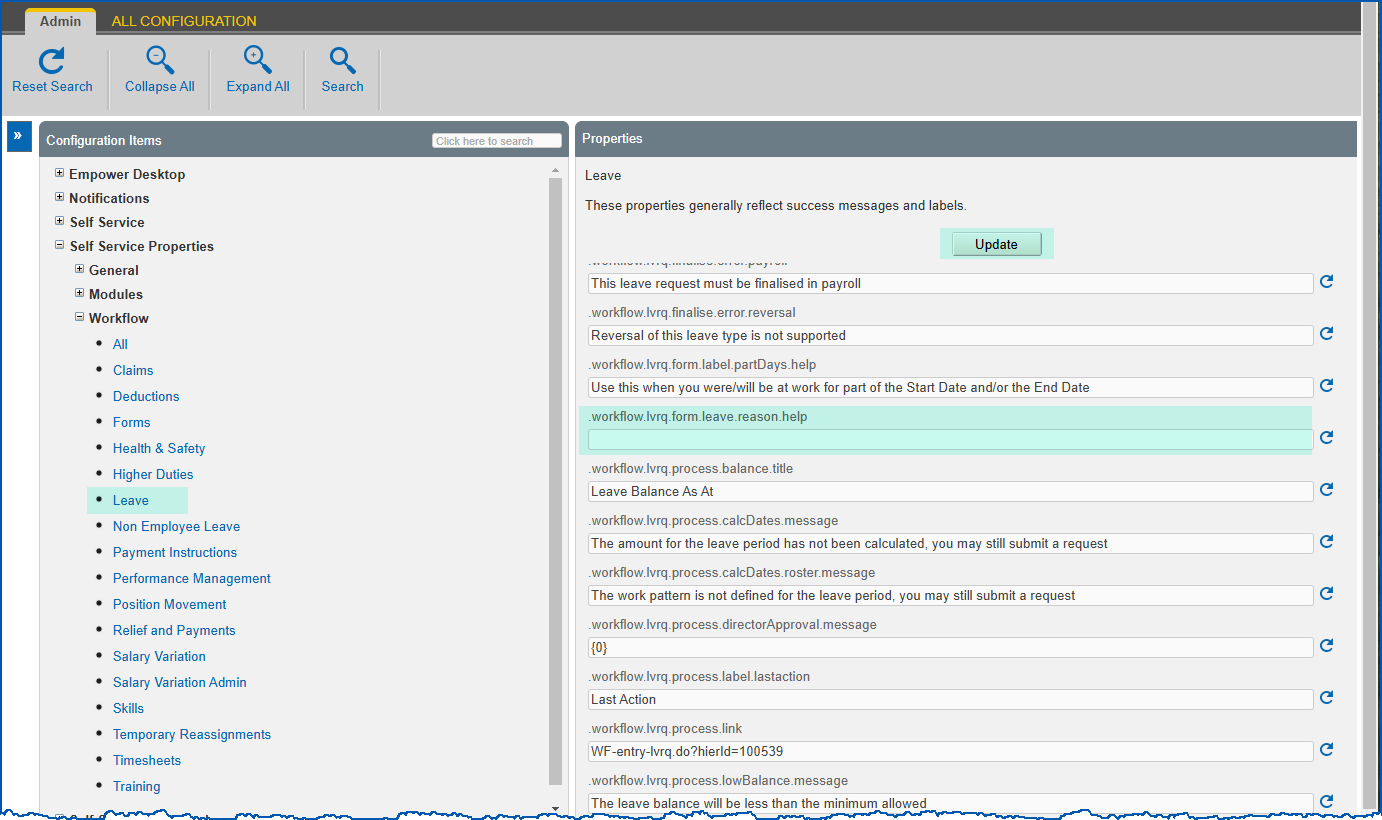
- Click Update.
Display pay rate
Use the following instructions to define which leave requests display the Pay Rate field.
To display the pay rate field on the leave request:
- Go to Administration > Configuration > All Configuration.
- At Configuration Items, expand Self Service, and then expand Employee Self Service.
- Click (pprt) Pay rate leave element.
- At the Character field, enter the leave element code that contains the relevant leave types/codes. (The Pay Rate field remains hidden for any leave types not included in the selected leave element).
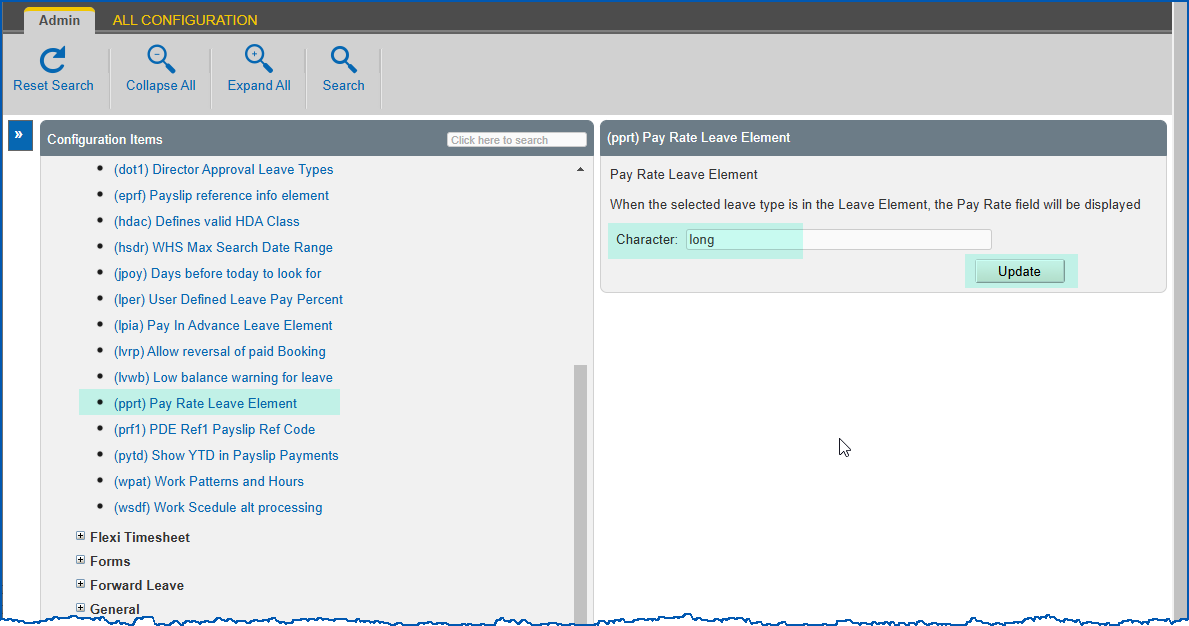
- Click Update.
Display pay rate percentage
You may choose to display the Pay Rate (percentage) on leave requests if your organisation allows employees to take leave at different percentage rates.
To display the pay rate (percentage) on leave requests:
- Go to Administration > Configuration > All Configuration.
- At Configuration Items, expand Self Service, and then expand Employee Self Service.
- Click (lper) User defined leave pay percent.
- Enter y in the Character field.
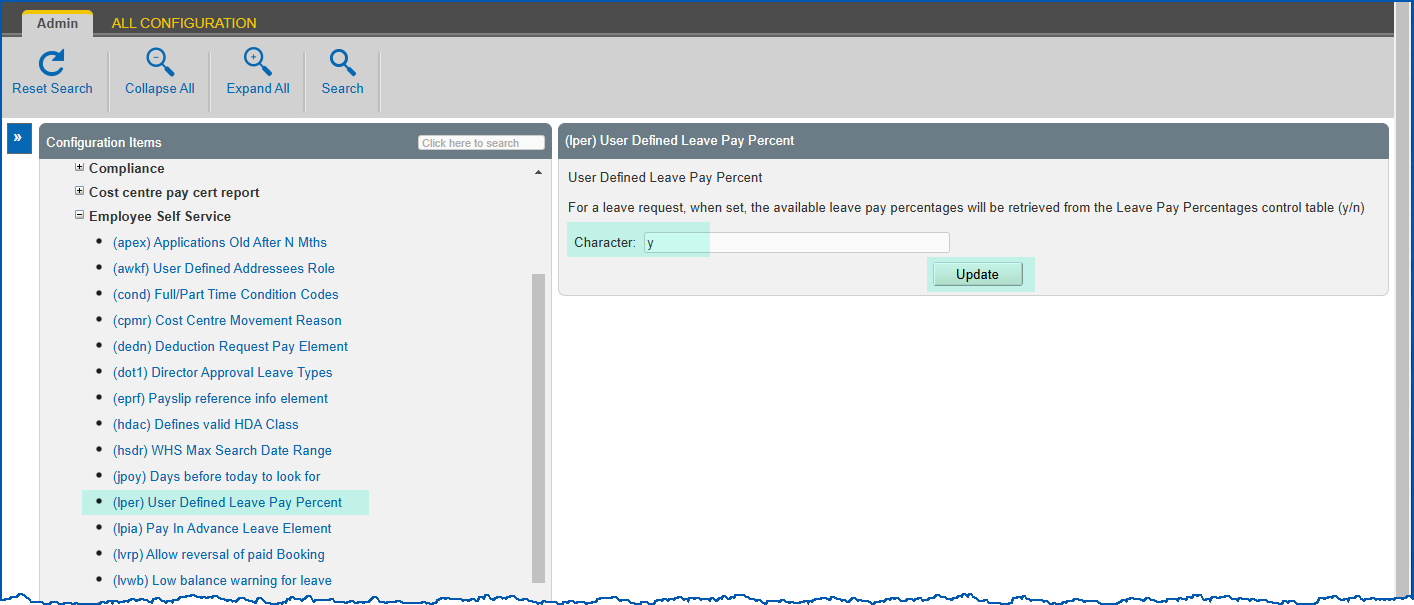
- Click Update.
You also need to make sure leave pay percentage codes in desktop contain all leave types and relevant percentage rates.
Display pay in advance field
Use the following steps to display the Pay in Advance? field on leave requests for certain leave rules.
To display the pay in advance field:
- Go to Administration > Configuration > All Configuration.
- At Configuration Items, expand Self Service, and then expand Employee Self Service.
- Click (lpia) Pay in advance leave element.
- At the Character field, enter the leave element code that contains the relevant leave rules.
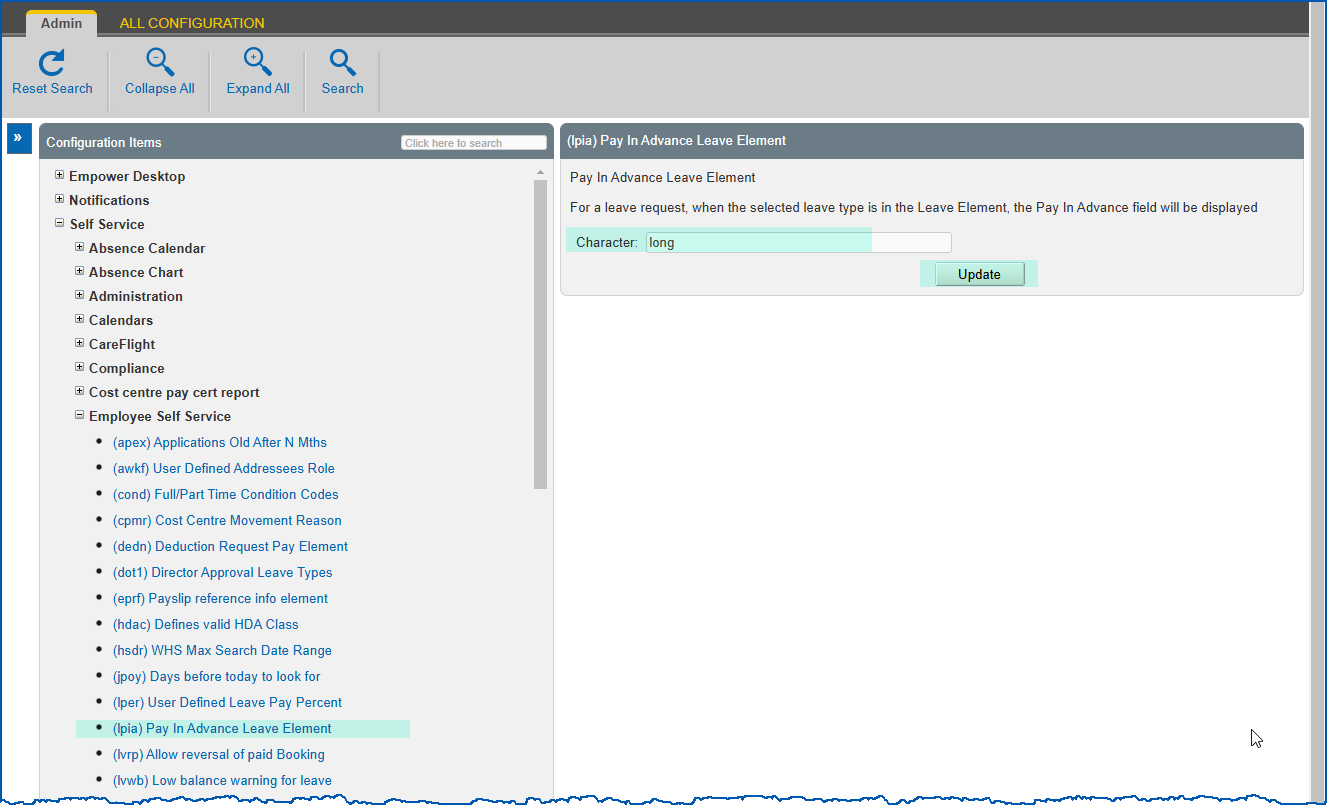
- Click Update.
© 2023 Fusion5. All rights reserved.