
EmpowerHR’s bulk upload wizard lets you upload employee compliance registrations in bulk.
You can only upload one registration type at a time, but there is no limit to the number of registrations or employees you can upload.
What files do I need to prepare?
For each registration type, you need to create a separate tab-delimited file containing the required data.
Before you start
Here’s what you need to know when creating the files:
- Don’t include column headings in your files.
- The Message/Notes data is optional, while all other data is mandatory.
- Use a valid EmpowerHR format for dates, for example:
- ddmmyy
- ddMmmyy
- ddMmmccyy
- You can’t upload attachments in a bulk upload.
- Once you upload registrations in bulk, EmpowerHR shows their status as Active.
Data requirements
Use the following tables as a guide when creating a file for each registration type. The numbers indicate how many columns you need to set up in each type of file.
NSW education standards authority accreditation
| Column > | 1 | 2 | 3 | 4 | 5 | 6 | 7 |
|---|---|---|---|---|---|---|---|
| Employee code | Accreditation number | Accreditation level | Initial accreditation date | Valid to | Payment valid to | Notes | |
| Characters > | 10 | 10 | |||||
| One of five levels | Date | Future date | Future date | Free text |
Teacher quality institute registration
| Column > | 1 | 2 | 3 | 4 | 5 | 6 | 7 | 8 | 9 |
|---|---|---|---|---|---|---|---|---|---|
| Employee code | Registration number | Registration level | Valid to | Additional Certificate | Valid from | Valid to | Payment date | Notes | |
| Characters > | 10 | 10 | |||||||
| One of three levels | Future date | One of two levels | Date | Future date | Date | Free text |
Working with children check
| Column > | 1 | 2 | 3 | 4 |
|---|---|---|---|---|
| Employee code | Registration number | Valid to | Message | |
| Characters > | 10 | 15 | ||
| Future date | Free text |
Working with vulnerable people
| Column > | 1 | 2 | 3 | 4 |
|---|---|---|---|---|
| Employee code | Registration number | Valid to | Notes | |
| Characters > | 10 | 10 | ||
| Future date | Free text |
Use the bulk upload wizard
To use the bulk upload wizard: 
- Go to Tasks > Compliance Management > Bulk Upload Wizard.
- At the Bulk Upload Wizard, select a Registration type from the dropdown list.
- At File Name, click Open File, navigate to, and select your (tab-delimited) data file to add the pathname to the File Name field.
- At the Bulk Upload Wizard, the name of the file you selected is added to the Filename field. For example:
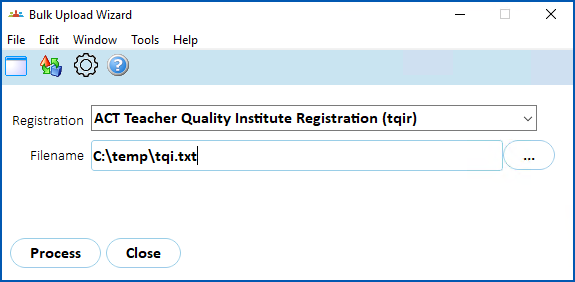
- Click Process to upload the data.
- If any data fails validation, the system displays an error log.
- Repeat this procedure until you’ve completed a bulk upload of data for all registration types.
© 2023 Fusion5. All rights reserved.