Can I create a TASC payment request?
- As an employee, you can create your own TASC
 payment requests in ESS.
TASC = Tasmanian Assessment. Standards & Certification
- As a manager, you can create a TASC payment request (on your employee's behalf) in MSS.
Create a TASC payment request in ESS
To create a TASC payment request in ESS: 
- Go to Requests > Relief and One-off Payments.
- At the Relief and One-off Payments catalogue, click New Request.
- At the initial Create New Relief and Payments Request screen, in:
- Employee Category, select TASC Employees from the dropdown list
- Payment Category, select TASC Payment from the dropdown list
- Click Next.
- At the Create New Relief and Payments Request detail screen, complete the TASC payment request fields.
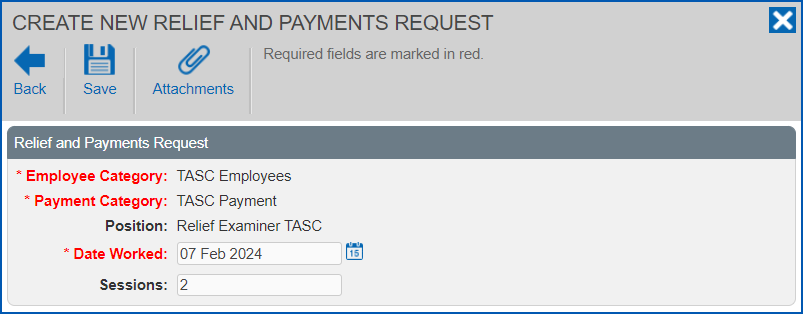
- If you:
- want to attach documents to the request, click Attachments, attach the files and click Confirm. Go to step 7.
- don't want to attach documents to the request, then go to step 7.
- Click Save.
- At the Workflow :: Addressee dialog box, in:
- Send To, select an approver from the dropdown list
- Comments, add a message (optional)
- Click Send To to submit your request for approval.
- Your request appears in the Pending Requests list on the Relief and One-off Payments catalogue.
Create a TASC payment request in MSS
To create a TASC payment request in MSS:
- Go to Requests > Relief and One-off Payment.
- At the Relief and One-off Payments catalogue, click New Request.
- At the initial Create New Relief and Payments Request screen, in:
- Employee Category, select TASC Employees from the dropdown list
- Payment Category, select TASC Payment from the dropdown list
- Date Worked, click Date Lookup and select the date worked
- Employee, enter the employee's surname and then wait until the system responds with a list of employees with that surname. Select one from the dropdown list.
- Click Next.
- At the Create New Relief and Payments Request detail screen, complete the TASC payment request fields.
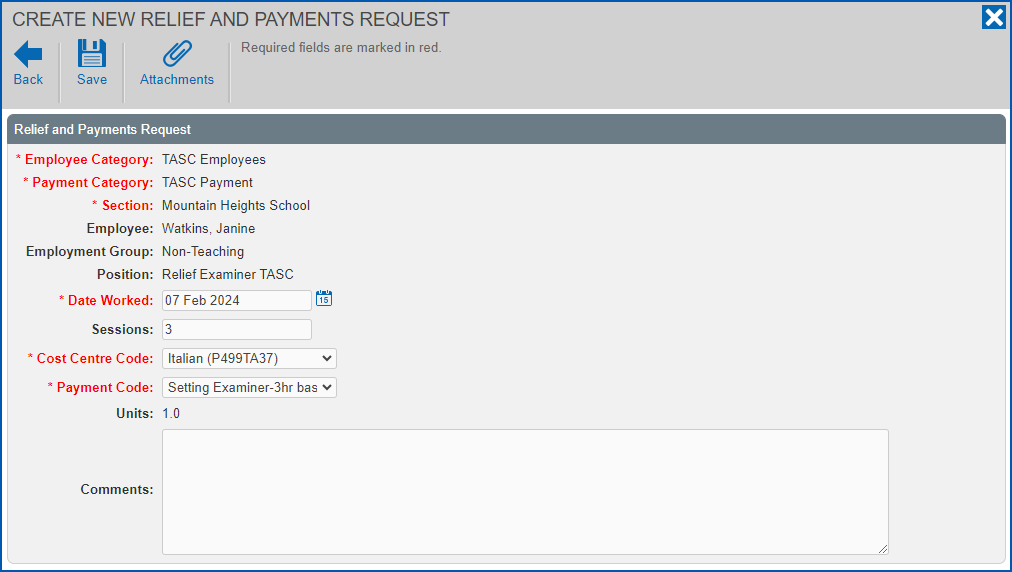
- If you:
- want to attach documents to the request, click Attachments, attach the files and click Confirm. Go to step 7.
- don't want to attach documents to the request, then go to step 7.
- Click Save. How the approval workflow is set up in your organisation determines whether the Workflow :: Addressee dialog box displays, or the request is automatically finalised.
- If the Workflow :: Addressee dialog box:
- does display, then go to step 9.
- does not display, then finalise the request when EmpowerHR prompts you. No further action is required.
- In:
- Send To, select an approver from the dropdown list
- Comments, add a message (optional)
- Click Send To to submit the request for approval.
© 2023 Fusion5. All rights reserved.