EmpowerHR allows you to crossboard position movement data, and temporary position movement data, in two ways:
- by loading the data files via EmpowerHR desktop, and then running the background job to process the data (which we explain in this topic), or
- using web services (see crossboard position movements for more information)
Using web services automates much of the take-on procedure, however, the two processes are similar.
What position movements can I crossboard?
EmpowerHR supports eight crossboarding movement types. The function code goes in the first column of your data file.
Standard position movements
| Function code | Movement type |
|---|---|
| auto | General Movement |
| cond | Condition Change |
| ploy | New Employment |
| prom | Promotion |
| salc | Salary Change |
| tran | Transfer |
Temporary position movements
| Function code | Movement type |
|---|---|
| hda | Higher Class Duties |
| sec | Secondment |

|
Use the standard file format for auto, cond, ploy, prom, salc, and tran. Use the temporary file format for hda and sec.
|
What files do I need to prepare?
You need to create a tab-delimited (.txt) file containing the required data.
For the file format you need to use, see:

|
Split cost centre constraint. Employees with split cost centres can only have one movement per function in any single file. If you need two conditions changes for the same employee with multiple cost centres, prepare each movement as a separate file and run the procedure once per file. |
Crossboard position movement data
|
Before loading data, decide whether you want EmpowerHR to automatically create position movements as they're uploaded, or to manually approve them before they're created. This is controlled by Installation Option ocro (Allow Crossboarding Movements uploaded via a Spreadsheet or API automatically created). Set ocro to y for automatic creation, or leave it at n for manual approval. |
To crossboard position movement data in bulk:
- Go to Background Jobs > Bulk Data Take-On > Crossboarding > Crossboarding Initiation.
- Select the option, 2. Position Movement data load.
- At Load Type, select the option, 1. Position movement data from the dropdown list.
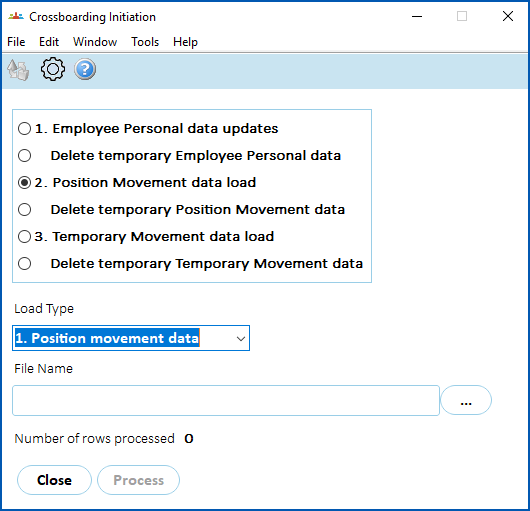
- At File Name, click Open File, navigate to, and select your data file to add the pathname to the File Name field.
- Click Process.
- If you:
- want to upload split cost centres for the movements, then go to step 7.
- don't want to upload split cost centres for the movements, then go to step 10.
- At Load Type, select the option, 2. Split cost centres data from the dropdown list.
- At File Name, click Open File, navigate to, and select your data file to add the pathname to the File Name field.
- Click Process.
- Once you have uploaded all your data files, go to Background Jobs > Bulk Data Take-On > Crossboarding > Crossboarding Process.
- At the Crossboarding Process (add) screen, click Save to start processing the data.
- To check the status of the job, go to Background Jobs > Requested Jobs > Requested Jobs.
- To check for any errors once the bulk upload job is finished, go to Background Jobs > Bulk Data Take-On > Crossboarding > Crossboarding Error Enquiry.
Crossboard temporary position movement data
To crossboard temporary position movement data in bulk:
- Go to Background Jobs >Bulk Data Take-On > Crossboarding > Crossboarding Initiation.
- Select the option, 3. Temporary Movement data load.
- At Load Type, select the option, 1. Temporary position movement data from the dropdown list.
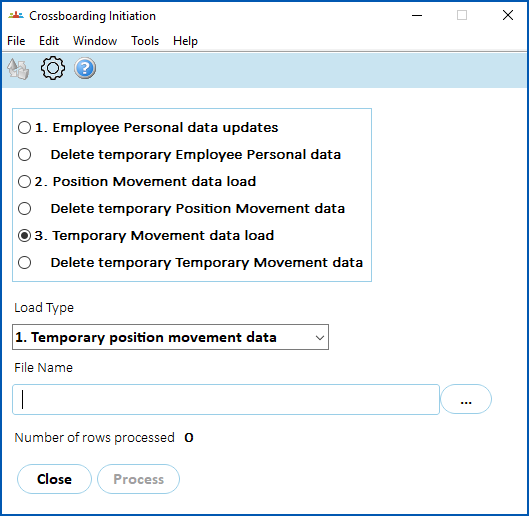
- At File Name, click Open File, navigate to, and select your data file to add the pathname to the File Name field.
- Click Process.
- If you:
- want to upload split cost centres for the movements, then go to step 7.
- don't want to upload split cost centres for the movements, then go to step 10.
- At Load Type, select the option, 2. Split cost centres data from the dropdown list.
- At File Name, click Open File, navigate to, and select your data file to add the pathname to the File Name field.
- Click Process.
- Once you have uploaded all your data files, go to Background Jobs > Bulk Data Take-On > Crossboarding > Crossboarding Process.
- At the Crossboarding Process (add) screen, click Save to start processing the data.
- To check the status of the job, go to Background Jobs > Requested Jobs > Requested Jobs.
- To check for any errors once the bulk upload job is finished, go to Background Jobs > Bulk Data Take-On > Crossboarding > Crossboarding Error Enquiry.
© 2023 Fusion5. All rights reserved.