---
title: "Set up time & claims fields"
id: "set-up-time-claims-fields"
project: "EHR User Guide"
url: "https://help.cloud5.com.au/articles/ehr-user-guide/set-up-time-claims-fields"
updated: 2026-10-19T00:53:42Z
---
# Set up time & claims fields
Fine tune EmpowerHR to suit how you want to use the time and claims feature.
|  | For more information about configuration file attributes, see the [self service functional configuration](/articles/ehr-user-guide/self-service-functional-configuration) in this Guide, and [review parameters & arguments in self service/desktop](/smart/project-ehr-technical-user-guide/review-parameters-arguments-in-self-service-desktop) in the EHR Technical User Guide.
If you'd like assistance with setting up time and claims fields or getting access to the EHR Technical User Guide, contact us by logging an [ihelp request](https://infusion.fusion5.com/). |
| --- | --- |
## Set up cost centre selection
If you want to restrict the list of cost centres available for users to select from in time and claims screens, enter SQL into the self service cost restriction configuration file attribute.
SQL = Structured Query Language used to manage data, especially in a relational database management system
## Set up job selection
If you want to restrict the list of jobs available for users to select from in time and claims screens, enter SQL into the self service job restriction configuration file attribute.
## Set up classification selection
If you want to restrict the list of classifications available for users to select from in time and claims screens:
* enter a value in the Classification Sort Code3 field in each of the classifications you want to use
* enter the same value in the Character Variable field in the installation option called [restrict claim classifications (](/articles/ehr-user-guide/set-installation-preferences-time-claims/a/clas)**[clas](/articles/ehr-user-guide/set-installation-preferences-time-claims/a/clas)**[)](/articles/ehr-user-guide/set-installation-preferences-time-claims/a/clas)
To enter a classification sort code 3 value on a classification:
1. Go to **Tasks** > **Classifications** > **Class Input**.
2. At the **Class Input** summary screen, click **Find Now** to see a list of existing classifications.
3. Find and select the classification, and then click **Open**.
4. EmpowerHR displays the **Class Input (change)** detail screen.
5. Enter a value in the **Classification Sort Code3** field.
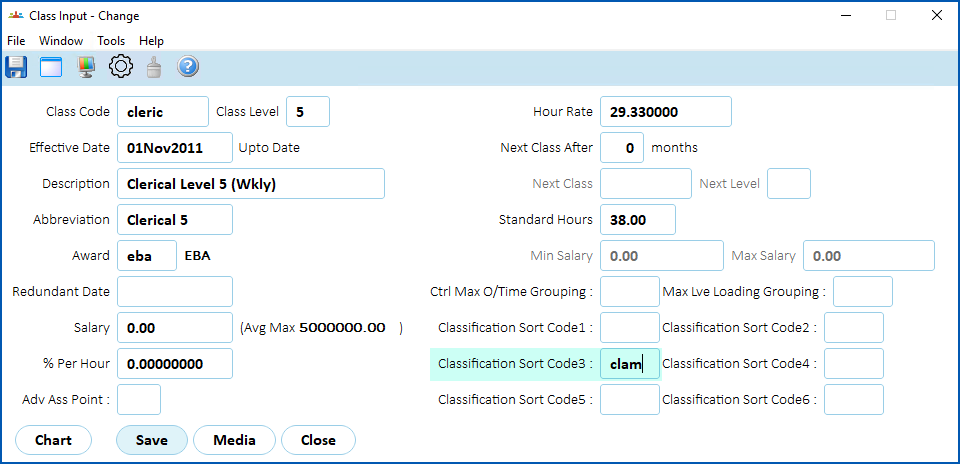
1. Click **Save**.
## Set up reference3 field
If you want to:
* restrict the list of reference3 options available for users to select from in time and claims screens, enter SQL  into the self service ref3 restriction configuration file attributeSQL = Structured Query Language used to manage data, especially in a relational database management systemSQL = Structured Query Language used to manage data, especially in a relational database management system
* set a default reference3 option to display in time and claims screens, enter SQL into the self service ref3 default configuration file attribute
Check to make sure users can see, and make selections from, the reference3 field.
To make sure the reference3 field is visible and can be edited: 
1. Go to **Administration**> **Screen Management**>**Screen Painting**.
2. At **Screen Painting**, expand the **Self Service** list of screens,
3. Expand **Requests**, and then expand **Time and Claims**.
4. At **Add Time and Claims**,****click **Change**.
5. At **Screen Painting - Time & Claims Details**, scroll down and locate the **Reference3**field.
6. In the:
1. **Visibility** column, select **Display** from the dropdown list
2. **Mode**column, select **Enterable** ****from the dropdown list
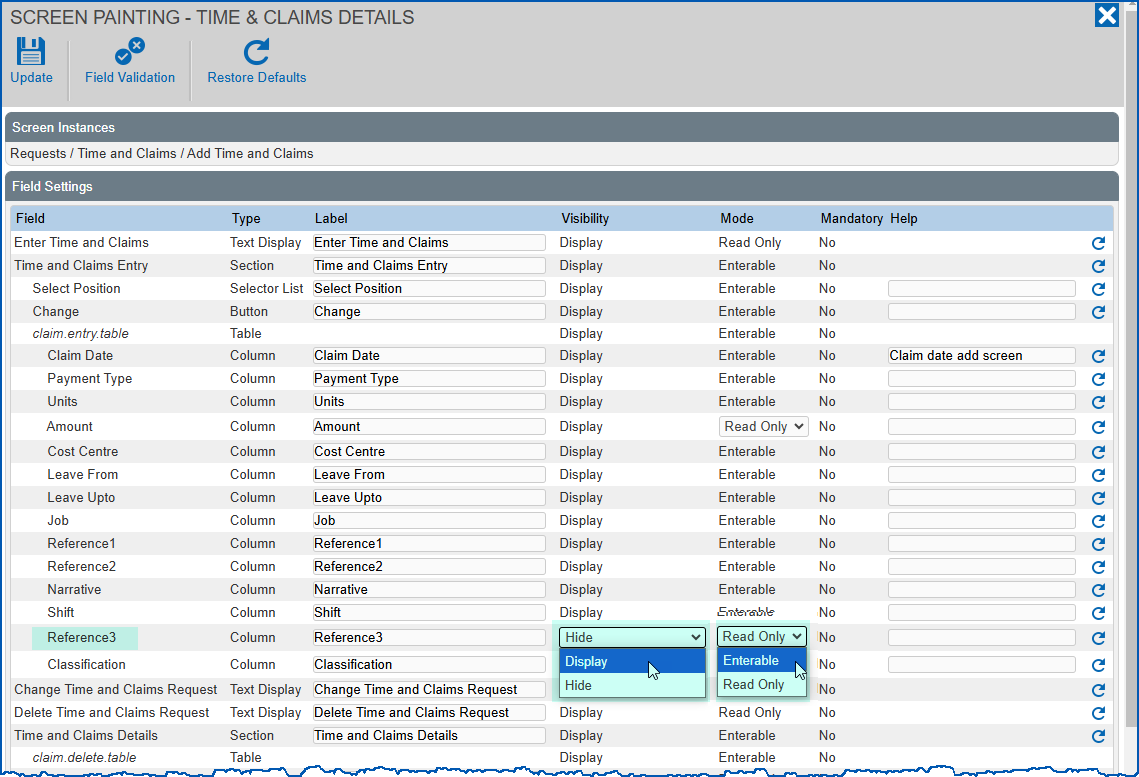
1. Click **Update**.
## Set up amount field
Set the amount field to read only for time and claims entry screens and workflow approval screen.
To set the amount field in time and claims entry screens to read only:
1. Go to **Administration**> **Screen Management**>**Screen Painting**.
2. At **Screen Painting**, expand the **Self Service** list of screens,
3. Expand **Requests**, and then expand **Time and Claims**.
4. At **Add Time and Claims**,****click **Change**.
5. At **Screen Painting - Time & Claims Details**, scroll down and locate the **Amount** field.
6. In the **Mode**column, select **Read Only** from the dropdown list.
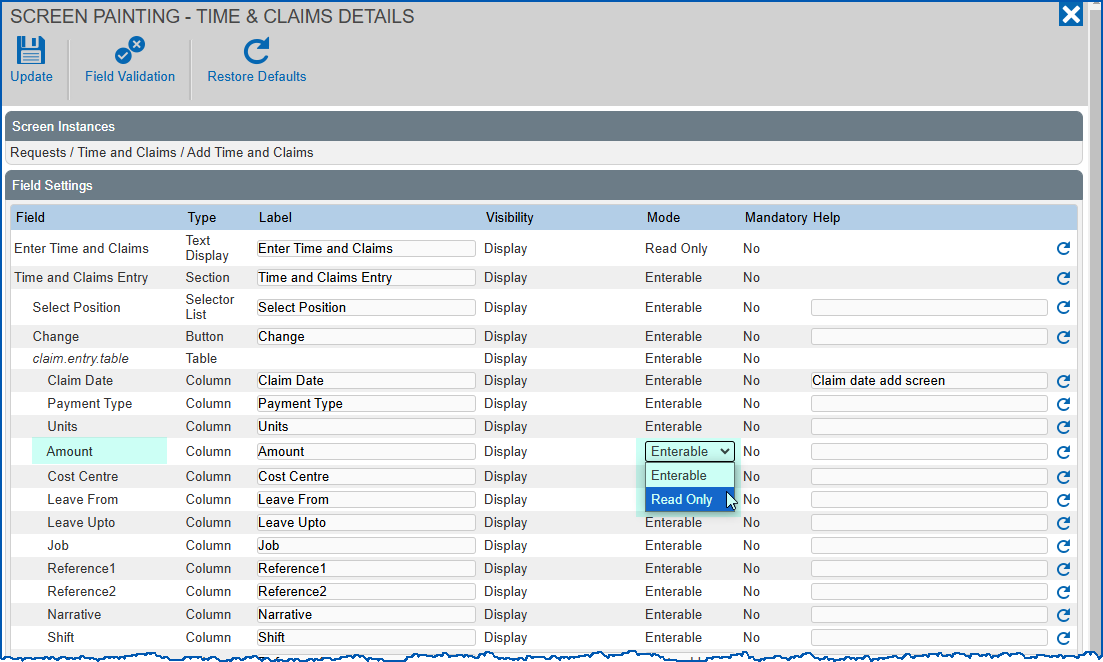
1. Click **Update**.
To set the amount field in time and claims workflow approval screen to read only:
1. Go to **Administration**> **Screen Management**>**Screen Painting**.
2. At **Screen Painting**, expand the **Self Service** list of screens,
3. Expand **Workflow**, and then expand **Time and Claims**.
4. At **Approval**,****click **Change**.
5. At **Screen Painting - Time & Claims Approval**, scroll down and locate the **Amount** field.
6. In the **Mode**column, select **Read Only** from the dropdown list.
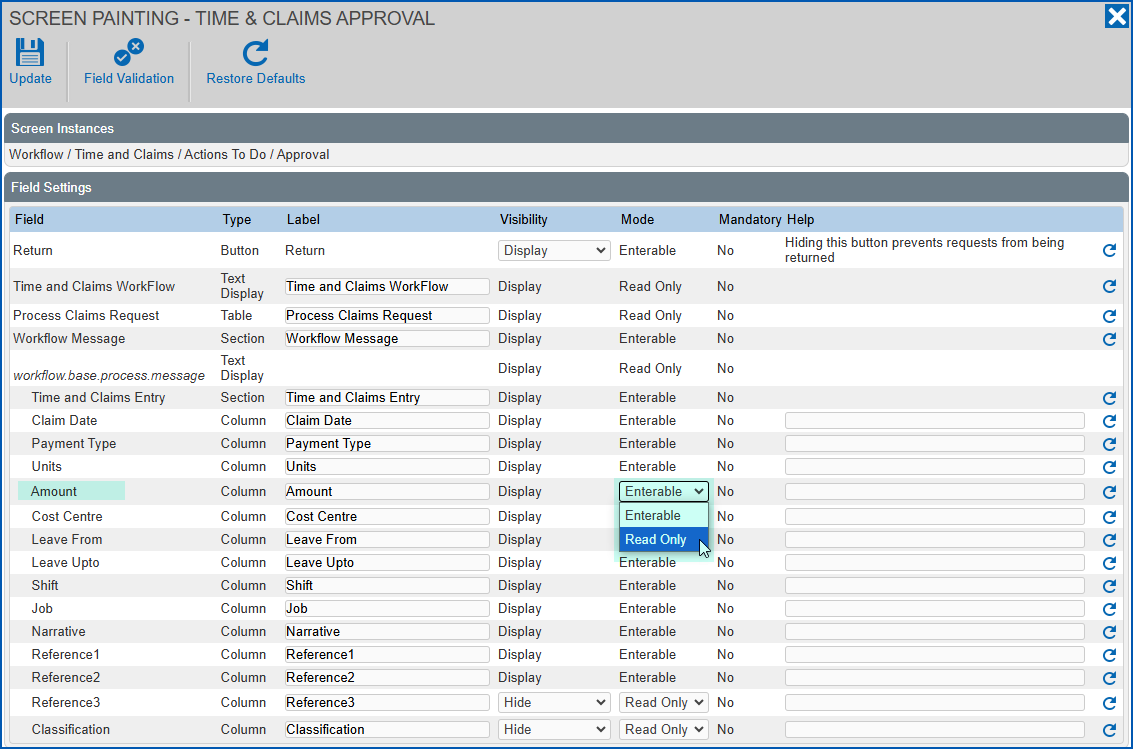
1. Click **Update**.
| Next topic
[Check time & claims approval workflow](/articles/ehr-user-guide/check-time-claims-approval-workflow) |
| --- |
© 2023 Fusion5. All rights reserved.