---
title: "Bulk upload control table data"
id: "bulk-upload-control-table-data"
project: "EHR User Guide"
url: "https://help.cloud5.com.au/articles/ehr-user-guide/bulk-upload-control-table-data"
updated: 2026-10-19T00:52:50Z
---
# Bulk upload control table data
This topic shows how to use bulk take-on for control table data.
## What data file format do I need to use?
The format depends on the type of data you are loading. For the format to use, see:
* [Cost centre codes file format](/articles/ehr-user-guide/cost-centre-codes-file-format)
* [Classification codes and elements file formats](/articles/ehr-user-guide/classification-codes-and-elements-file-formats)
* [Super funds file format](/articles/ehr-user-guide/super-funds-file-format)
* [Organisational level file format](/articles/ehr-user-guide/organisational-level-file-format)
* [Work patterns file format](/articles/ehr-user-guide/work-patterns-file-format)
* [GL payment code accounts file format](/articles/ehr-user-guide/gl-payment-code-accounts-file-format)
## Upload control table data in bulk
To upload control table data in bulk:
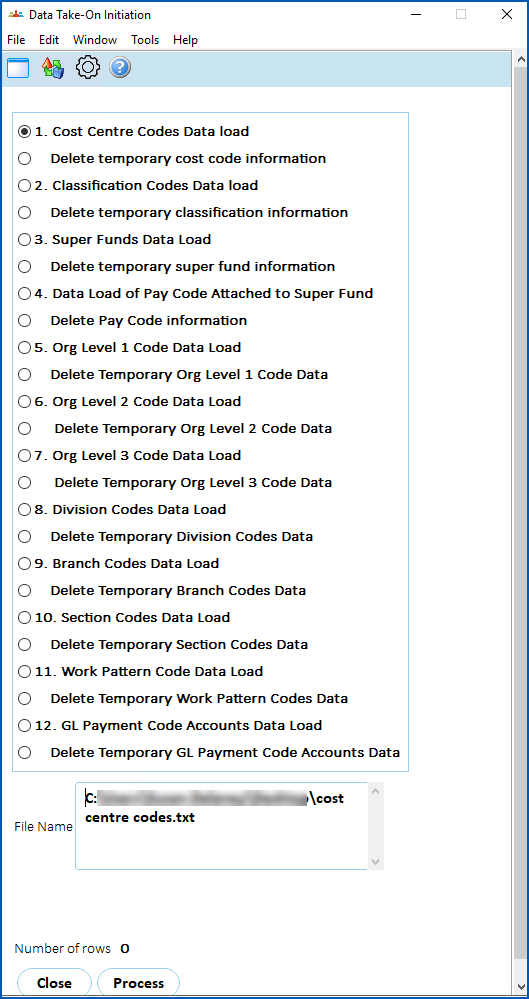
1. Go to **Background Jobs** > **Bulk Data Take-On** > **Control Table Data** > **Data Take-On Initiation**.
2. At**Data Take-On Initiation**, select an option.
3. At **File Name**, click **Window**, navigate to, and select your data file to add the pathname to the **File Name** field.
|  | With some take-on options, EmpowerHR displays two **File Name** fields. At the second field, repeat step 3 to select the second file. |
| --- | --- |
1. Click **Process**.
|  | When you click **Process**, the **Number of rows** processed counter displays how many records have been uploaded into temporary tables. |
| --- | --- |
1. Once you have uploaded your data file(s), go to **Background Jobs > Bulk Data Take-On > Control Table Data > Data Take-On Process**.****
2. At **Data Take-on Process**, click **Save** to start processing the data.
3. To check the status of the job, go to **Background Jobs** > **Requested Jobs** > **Requested Jobs**.
4. To check for any errors once the bulk upload job is finished, go to **Background Jobs > Bulk Data Take-On > Control Table Data > Data Take-On Error Enquiry**.
5. Clear the temporary table for the data type you just loaded. At **Data Take-On Initiation**, select the delete option for your data type and click **Process**. Do this before reloading corrected data or before loading the next spreadsheet. Otherwise the next load combines with data left over from this one.
|  | This step is required. Skipping it causes the next load to combine with data already in the temporary table, which produces unexpected results when the next **Data Take-On Process** job runs. |
| --- | --- |
6. If there are errors, correct them in your spreadsheet and repeat this procedure to reload the data.
| Next topic
[Cost centre codes file format](/articles/ehr-user-guide/cost-centre-codes-file-format) |
| --- |
© 2023 Fusion5. All rights reserved.